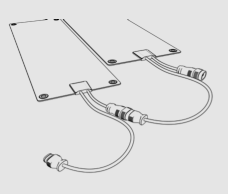
How Many Mats Can I Connect?
Connecting The Mats Together
- The mats are designed with watertight connector cables so that multiple stair and walkway mats can be connected together. NOTE: Entrance mats (the ones made for door entrances) are designed to be stand-alone mats and do not connect to other mats.
- Walkway mats can connect to step mats and vice versa, but you can't connect a driveway mat to a walkway or step mat due to the different wattage.
- Like Christmas lights, these mats can only be daisy-chained up to a certain length. This length depends on how many stair and walkway mats you are connecting together. The best way to determine how many mats can be connected together is by adding up the total amps of each mat (see the bottom of this page), which can be found on the small labels around the male connectors.
- The Power Unit that connects your mats to your outdoor outlet is designed to safely handle up to 15 amps; however, we recommend not exceeding 14 amps.
Examples
- Example I - If you connect three 20" x 60" walkway mats (2.5-amps each) with five 10" x 30" stair mats (0.7A
each) you only have 11- amps, so you’re ok. - Example II - If you connect three 20" x 60" walkway mats (2.5-amps each) with five 10" x 30" stair mats (0.7A If you connect eighteen 10" x 30" stair mats you will have a total of 12.6-amps, so you’re also ok.
If the mats you are connecting will exceed 14-amps, then disconnect some of the mats and put them on a different Power Unit. Remember, no more than 14 amps per Power Unit.
Outdoor Outlets
- IMPORTANT: Now that you have read the above section, it is important for you to know the rating of your outdoor outlet.
- Most outdoor outlets are rated to handle up to 15-amps. Some newer outlets can handle up to 20-amps. If you have connected up to 14-amps of heating mats, even if you only used one Power Unit, you cannot plug anything else into that outdoor outlet, unless you know that the amp rating on your outdoor outlet is greater than 15-amps.
- Similarly, if there are other items plugged into that outdoor outlet (Christmas lights, etc.), you may not be able to connect the full number of mats to your Power Unit. If you have any questions, please consult with a certified electrician.
Lets Now Connect Your Mats
Connecting The Mat Cords
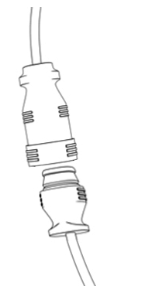
- To connect mats together, find the female connector of mat #1, and connect it to the male connector of mat #2. Align the 2 connectors, and firmly push the connectors together so they are flush with each other. If the male and female ends feel like they do not connect together, flip the male end of the cord 180 degrees and try again.
- Once the male and female cords are securely connected, slide the locking sleeve over the seam to ensure a
water-tight seal.
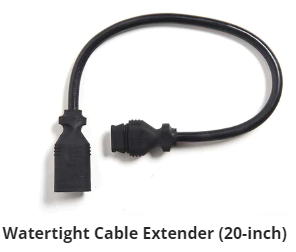
Need a Cable Extender?
- You may require a Cable Extender if you get into a situation where the small male connector of a walkway mat needs to connect to the small female connector of a stair mat. The 20″ long Cable Extender will allow you to make this connection. This Cable Extender is available from ALCO, just ask your sales associate if needed.
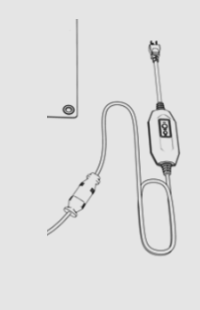
Connecting the Power Unit
- Every grouping of mats requires a Power Unit to connect the mats to the electrical outlet on the wall.
- The Power Unit connects to either the first or last mat in your system. DO NOT CONNECT THE POWER UNIT TO THE ELECTRICAL OUTLET UNTIL ALL OF THE MATS ARE PROPERLY CONNECTED TO EACH OTHER AND THE POWER UNIT IS CONNECTED TO THE LAST MAT.
- To connect the Power Unit, use the same method described above for connecting the male and female connectors. But first, read below regarding the Light Tester. Note, if you have an Entrance Mat, you do not need a Light Tester.
Lets Now Test Your Mats
Using The Light Tester
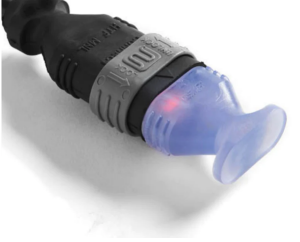
- The Power Unit you purchased comes with a detachable clear module pre-inserted at the end of the 6 ft cable. This module is called the Light Tester. It is designed to let you know whether electricity is flowing through the mats or not.
- This Light Tester will illuminate when electricity is flowing properly. For example, plug the Power Unit into an outlet and make sure the Power Unit is on. The Light Tester will illuminate.
- To use the Light Tester, remove the Light Tester from the Power Unit cable and insert it into the female connector of the last mat in your system.
- After the Light Tester is inserted into the last mat, connect the female cable of the Power Unit to your first mat in the system. Then plug the Power Unit into an electrical outlet and make sure the Power Unit is on.
- If all the mats in your system are connected properly, the Light Tester at the end of your system will illuminate. If it does not illuminate, then one or more of your mats are not connected properly. If this is the case, see below:
How To Determine Which Mat Is Not Connected
- Remove the Light Tester from the last mat in the system and insert it into the female end of mat #1 of your system. DO NOT FORGET TO RE-INSERT THE TESTER INTO THE LAST MAT WHEN YOU ARE FINISHED TESTING THE SYSTEM.
- If the Light Tester illuminates then the Power Unit is properly connected to mat #1. Proceed to mat #2. Reconnect mat #1 to mat #2 and insert the Light Tester into the female end of mat #2, and so-on.
- If when performing this test the Light Tester does not illuminate, there is a bad connection between that mat and the one prior to it. In this case, disconnect and reconnect mats again and push connectors firmly together. Make sure the connectors are flush with each other and re-test.

Testing The Power Unit
- For general safety, the Power Unit comes with a built-in Ground Fault Circuit Interrupter (GFCI) located on the power supply cord. This device turns off the power in the event of a short circuit.
- It is important to test the GFCI to be certain it is working properly- both after the mat is installed and before seasonal use. Here is all you need to do:
- Step 1 - Locate the test and reset buttons on the device.
- Step 2 - Plug the power cord into the outlet. Press the reset button. A red or green light will appear.
- Step 3 - Press the test button. The red or green light should go out.
- Step 4 - Press the reset button again, and the red or green light should come back on.
- Step 5 - If the light does not come on, ensure there is voltage at the outlet. If the safety device still does
not work, contact ALCO customer service.
- CAUTION: To Provide Continued Protection Against Risk of Electric Shock, Connect Connect to Properly Grounded
to Properly Grounded Outlets Only Outlets Only. The mat is on when a light appears on the Power Unit and/ or the Light Tester is illuminated. If no light appears on the Power Unit, refer to the section about testing the Power Unit.
Anchoring Your Mats
How to Anchor the Mats
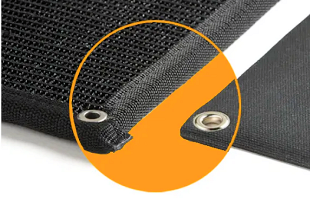
- Should you decide you want to secure the mats down, the mats are designed with 3/8″ diameter grommet holes in each corner to make securing the mats simple and effective. Securing the mats minimizes tripping and keeps them from moving.
- To secure the mats you must use these holes. Use a stainless steel or galvanized screw that is appropriate for the surface the mats are lying on (i.e. wood screw for deck, concrete screw for concrete, etc.)
- NOTE: double sided tape may be used as an alternate method to secure the mats; 3M VHB 4941 tape is recommended, follow manufacturer’s instructions for installation.
Cautions & Warnings

- Mats should never have anything lying on them, the heating elements inside of the mats are made to melt snow and if you put blankets, tarps, straw, other mats...ect on top of them they will likely overheat and damage the mat.
- Packages should never be left on top of mats, especially mats that are turned on. We STRONGLY suggest leaving a note for your delivery person that says: Do not leave packages on heated mats!
- Store indoors after the winter season.
- Inspect the Cord Before Using.
- Only use extension cords rated for outdoor use and
- with a minimum rating of 15 amps.
- Read all Instructions.
- Do not modify the safety device or the plug connected to the mats.
- Do not plug in mats while stacked on top of one another.
- Do not drive any form of nails, screws, fasteners, or other objects through the surface of the mats. Use only the pre-drilled mounting holes for securing the mats.
- Do not cut, slice, trim, or otherwise alter the mat's surface.
- Do not walk on the mats before they are completely installed.
- Do not install the mats on rough dirt or gravel surfaces.
- WARNING: Electrical Hazard These mats must be installed per ALCO instructions. Follow these important warnings to avoid the risk of fire or shock.
- CAUTION: To Provide Continued Protection Against Risk of Electric Shock, Connect to Properly Grounded Outlets Only. Do not exceed the electrical rating of your outdoor outlet.
- CAUTION: To provide continued protection against electric shock: A - Have a qualified electrician install a properly grounded outlet, acceptable for outdoor use and protected from snow and rain, immediately adjacent to the location where the heating mat will be used. B -Route the supply cord and locate the heating mat to be protected from damage. C -Inspect the cord before using. D -Unplug the heating mat at the receptacle outlet when not in use or before removing it. E - Store the heating mat indoors after the winter season.
- IMPORTANT: All information, including illustrations, is believed to be reliable. Users, however, should independently evaluate the suitability of each product for their application.
AMPS
Reminder: The best way to determine how many mats can be connected together is by adding up the total amps of each mat. HeatTrak recommends not exceeding 14-amps per outlet. If the mats you are connecting will exceed 14-amps then disconnect some of the mats and put them on a different Power Unit.
Walkway Mats
The amp draw per mat on the spec sheet is +/- 10%
Dimensions | Voltage | Amps | Weight (lbs)
24" x 5FT | 120V | 2.6 | 21
24" x 5FT | 240V | 1.3 | 21
24" x 10FT | 120V | 5.3 | 42
24" x 10FT | 240V | 2.7 | 42
24" x 15FT | 120V | 8.1 | 63
24" x 15FT | 240V | 4.1 | 63
24" x 20FT | 120V | 10.9 | 84
24" x 20FT | 240V | 5.4 | 84
36" x 5FT | 120V | 3.9 | 32
36" x 5FT | 240V | 1.9 | 32
36" x 10FT | 120V | 8.0 | 63
36" x 10FT | 240V | 4.0 | 63
36" x 15FT | 120V | 12.2 | 94
36" x 15FT | 240V | 6.1 | 94
36" x 20FT | 240V | 8.2 |126
48" x 6FT | 120V | 6.3 | 51
48" x 6FT | 240V | 3.1 | 51
48" x 10FT | 120V | 10.7 | 84
48" x 10FT | 240V | 5.3 | 84
Stairway Mats
The amp draw per mat on the spec sheet is +/- 10%
Dimensions | Voltage | Amps | Weight (lbs)
11" x 3FT | 120V | 0.7 | 6
11" x 3FT | 240V | 0.3 | 6
11" x 4FT | 120V | 0.9 | 8
11" x 4FT | 240V | 0.4 | 8
11" x 5FT | 120V | 1.1 | 12
11" x 5FT | 240V | 0.6 | 12
11" x 6FT | 120V | 1.4 | 13
11" x 6FT | 240V | 0.7 | 13
11" x 7FT | 120V | 1.6 | 14
11" x 7FT | 240V | 0.8 | 14
11" x 8FT | 120V | 1.9 | 15
11" x 8FT | 240V | 0.9 | 15
Ramp Mats
The amp draw per mat on the spec sheet is +/- 10%
Dimensions | Voltage | Amps | Weight (lbs)
24" x 5FT | 120V | 3.09 | 35
24" x 10FT | 120V | 8.00 | 71
24" x 15FT | 120V | 12.20 | 106
Driveway Mats
The amp draw per mat on the spec sheet is +/- 10%
Dimensions | Voltage | Amps | Weight (lbs)
24" x 20FT | 120V | 3.14 | 94
24" x 20FT | 240V | 5.14 | 94
24" x 25FT | 240V | 21.0 | 115
